
On this page
- What this workflow does
- What you need before you start
- Step 1: Create the lead form
- Step 2: Save the lead to Google Sheets first
- Step 3: Prepare the reply
- Step 4: Create a Gmail draft
- Step 5: Update the lead status
- Run the workflow and check each result
- Troubleshooting from our own setup
- Template reply or AI reply?
- When to use a CRM instead of Sheets
- Privacy and security notes
- Frequently asked questions
- Want this built for your business?
A lead fills in your form, the message lands somewhere, and someone has to notice it, write back and keep track of it. When lead follow-up depends entirely on manual steps, enquiries can be delayed or missed.
In this tutorial you will build a small n8n workflow that catches a lead from a form, saves it to Google Sheets first, prepares a personal-looking reply and creates a Gmail draft you can review before anything is sent. It is a good first workflow because it uses a pattern many business automations follow: a trigger, a few steps and a record of what happened.
The build below comes from one real run on our own n8n setup. The verified run used for this guide was execution #2689. It finished successfully in 5.076 seconds. We created a Gmail draft rather than sending a live email, so you can copy the build without emailing anyone by accident.
What this workflow does
Key takeaways
- The workflow saves the lead to Google Sheets before it does anything else, so a later failure does not lose the lead.
- The reply in our test is a template filled in with the lead's own answers. It is not written by AI.
- We ended with a Gmail draft, not a sent email. Sending and AI are optional extensions you can add later.
The five steps, in order:
- A form trigger receives the lead's name, email, source and message.
- Google Sheets adds the lead as a new row.
- An Edit Fields node prepares the reply subject and body.
- Gmail creates a draft addressed to the lead.
- Google Sheets updates the same row so its status reads "Draft Prepared".

What we tested and what we did not
| Tested in our run | Not tested in this guide |
|---|---|
| Form Trigger using the Test URL | The Production URL and publishing the workflow |
| Saving the lead to Google Sheets first | Gmail Send (live email) and email delivery |
| Edit Fields template reply | An AI or OpenAI node |
| Gmail Draft > Create | Error workflows |
| Updating the row status | Large numbers of leads |
What you need before you start
- An n8n account. We used a self-hosted Community Edition on a local computer (version 2.33.6). We did not test n8n Cloud, so check n8n's current plans yourself.
- A Google account with Gmail and Google Sheets.
- A Google Sheet with a tab named Leads. We used a test sheet with fake data only.
If you are still deciding which tool to learn, read n8n vs Zapier vs Make first. If you are not sure which task to automate first, the simple automation audit helps you pick one.
Step 1: Create the lead form
In a new workflow, add the n8n Form Trigger (n8n names it "On form submission"). The Form Trigger page lists the field types it supports, including text, email, dropdown and textarea.
We added four fields:
- Name: text, required
- Email: email, required
- Source: dropdown, required, with the options Website form, Referral and Social media
- Message: textarea
In our test the required fields showed a red marker on the form, and the page carried a banner reading "This is a test version of your form".
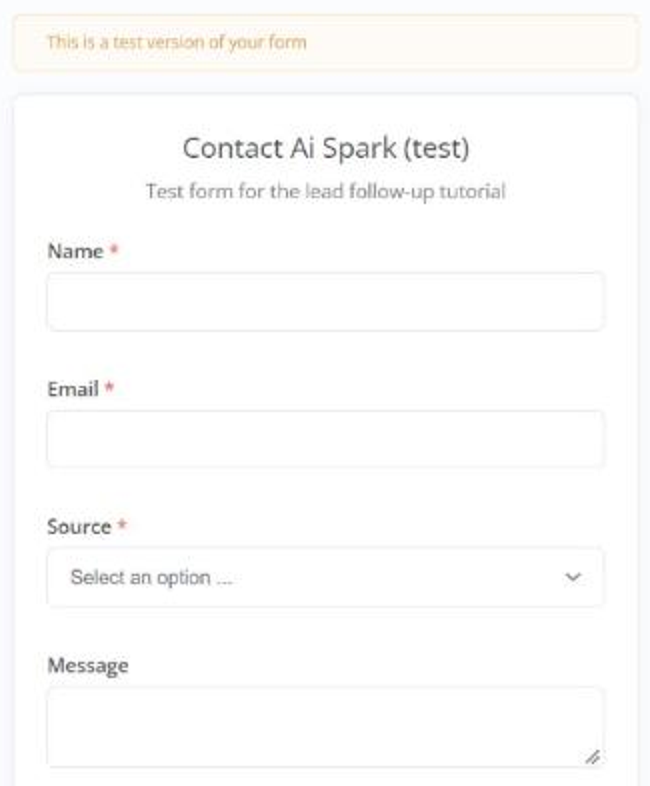
Click Execute workflow, open the test form, fill it in with fake details and submit. The submission appears in the node's output panel. Ours contained Name, Email, Source, Message and a submittedAt value.
Use your own email address, or a fake one, for tests. Never test with a real customer's details.
Test URL vs Production URL
The Form Trigger shows two links, a Test URL and a Production URL. According to the n8n docs, the test URL works while you are building and shows submitted data in the editor, while the production URL is registered when you publish the workflow, and its data appears in the Executions list instead.
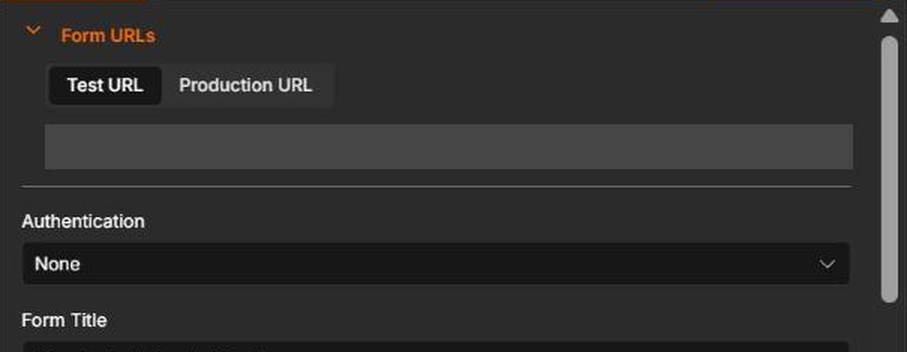
We used only the test URL. We did not publish the workflow or test the production URL, so check that step yourself before you share a form link with real people.
Already have a form on your website? The Webhook node can receive form data instead. We did not test that route.
Step 2: Save the lead to Google Sheets first
Create a tab called Leads with these headers in row 1:
Date | Name | Email | Source | Message | Reply Draft | Status
Add a Google Sheets node, choose Sheet Within Document, then the Append Row operation. Select your spreadsheet and the Leads tab. In our test we used Map Each Column Manually and set:
| Column | Value |
|---|---|
| Date | {{ $now.toFormat('yyyy-MM-dd HH:mm') }} |
| Name | {{ $json.Name }} |
{{ $json.Email }} |
|
| Source | {{ $json.Source }} |
| Message | {{ $json.Message }} |
| Status | New lead |
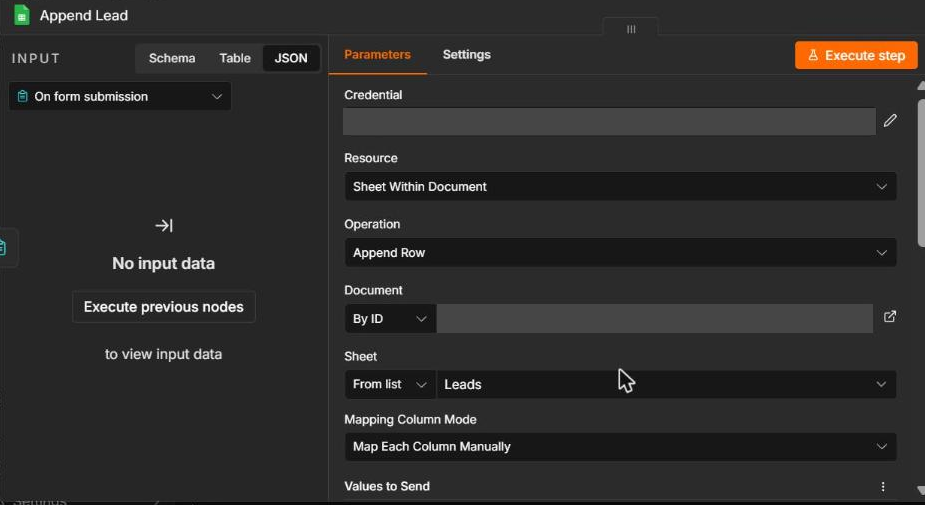
Why save before replying? If a later step fails, the lead is still recorded and you can follow up by hand. This is a design choice, not something we proved by breaking Gmail on purpose. The earlier version of this article put the reply before the log step, which meant a failed email would have left no record at all.
The n8n page for Google Sheets operations explains the mapping modes. Map Automatically only works when your incoming field names match your column names.
Step 3: Prepare the reply
Add an Edit Fields (Set) node and name it Prepare Reply. Use Manual Mapping and create two fields.
reply_subject
Thanks for contacting Ai Spark, {{ $('On form submission').item.json.Name }}
reply_body
Hi {{ $('On form submission').item.json.Name }},

Thank you for getting in touch about: {{ $('On form submission').item.json.Message }}

We have received your message and will review it. What is the main goal you want this to achieve?

The Ai Spark Team
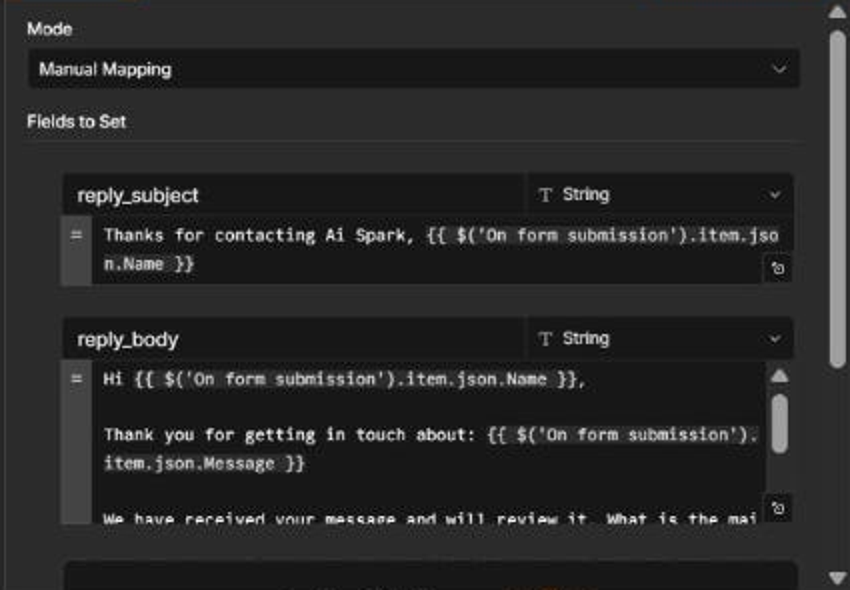
The parts inside double curly brackets are expressions. $('On form submission').item.json.Name reads the Name value from the form node by its name, which is why the reply can start with the lead's real name. The expressions guide shows the same style of reference. You can also drag fields from the input panel and let n8n write the expression.
Keep the template short and free of promises such as prices or delivery dates. Our template says the message was received and asks one question. It does not promise a reply time.
Step 4: Create a Gmail draft
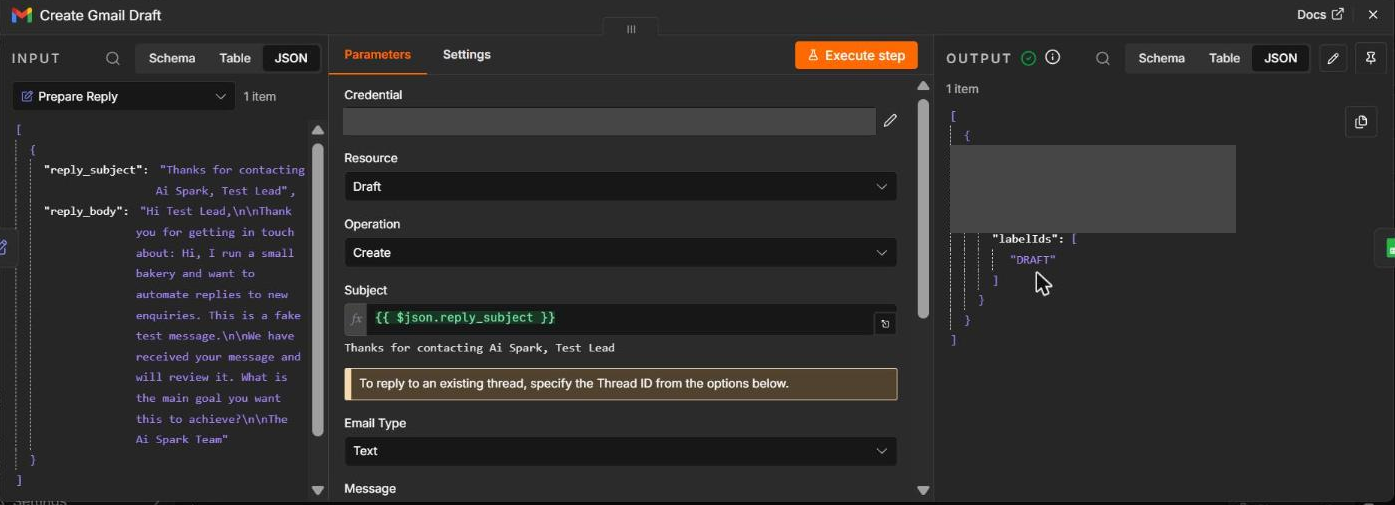
Add a Gmail node and set:
- Resource: Draft
- Operation: Create
- Subject:
{{ $json.reply_subject }} - Email Type: Text
- Message:
{{ $json.reply_body }} - Options > To Email:
{{ $('On form submission').item.json.Email }}
The recipient lives under Options. In the node it is called To Email. The n8n Gmail draft operations page lists it with the other options.
Gmail needs a connected Google credential. In our setup a Gmail credential was already connected, so we did not go through the Google sign-in screen in this test. If n8n asks you to sign in with Google and approve access, that step has to be done by you. See n8n's page on creating and editing credentials.
We chose a draft on purpose. A draft lets you read the reply before anything leaves your account. n8n also has a Gmail Send operation, but we did not use or test it.
In our run, the node's output showed the new draft with the label DRAFT. We then checked Gmail and found the draft with the expected subject, body and recipient. The recipient was a test address that belongs to us. No email was sent.
Step 5: Update the lead status
Add a second Google Sheets node named Update Status. This time use Append or Update Row and match on the Email column. Set:
| Column | Value |
|---|---|
{{ $('On form submission').item.json.Email }} |
|
| Reply Draft | {{ $('Prepare Reply').item.json.reply_body }} |
| Status | Draft Prepared |
Append or Update Row adds a new row if nothing matches, and updates the existing row if one does. In our run it updated the row for the lead, and the Status changed to Draft Prepared.
Choose your matching key on purpose. Matching on Email means a second submission from the same address updates the first row instead of creating a new one. That may be what you want, or it may overwrite useful history. Decide before real leads arrive.

Run the workflow and check each result
Click Execute workflow, submit the test form and watch the nodes turn green. Then check three places: the Sheet, your Gmail drafts and the execution view.
Our real test result
| Check | Result in the verified run |
|---|---|
| Execution | #2689, Succeeded |
| Runtime | 5.076 seconds |
| Lead saved before the reply step | Yes |
| Reply subject and body prepared | Yes |
| Gmail draft created | Yes |
| Email sent | No |
| Sheet Status | Draft Prepared |
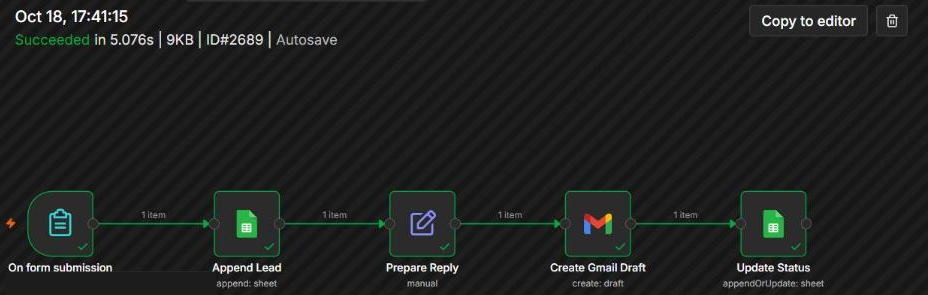
The Executions list is also your history. The n8n executions page explains that manual runs and production runs are different, and that only production runs count toward plan quotas.
Troubleshooting from our own setup
These are things that happened in our session. They are examples, not claims about every n8n install.
A "column schema is required" error. Our first run failed at the Google Sheets node. The message said column information was required. The node had been created without it. Our sheet node also said "No columns found" while the sheet was chosen by ID. After we chose the sheet From list and the columns loaded, the run succeeded. Our n8n login session also expired around that time, so we cannot say the by-ID option alone was the cause. If you see this, re-select the sheet from the list and check that the column names appear.
"Autosave failed: Unauthorized". Partway through setup, our local n8n login session expired. n8n showed "Autosave failed: Unauthorized" and "Problem loading credential". After we logged in to n8n again, the workflow ran. If you see this, log in again before you change anything else.
The time in the Sheet is not your local time. Our execution list showed 17:41, but the Date column showed 8:41, and the form data carried a -04:00 offset. The n8n expression reference says $now uses the workflow's time zone, which can be changed in the workflow settings. Check your workflow's setting if timestamps look wrong. See the expression reference.
A blank or wrong reply. Usually an expression points at the wrong node. Check the node name inside $('...') matches exactly.
Duplicate or overwritten leads. See the note on matching in Step 5.
If a workflow fails, n8n can run an error workflow that starts with an Error Trigger node, described on its error handling page. We did not set one up here.
Template reply or AI reply?
What we built uses a template. Every reply has the same shape, filled with the lead's own details. That is predictable and easy to check.
You can later add an AI node to write a more personal reply. n8n's OpenAI node page lists the available operations and credential options. We did not test an AI node for this guide, so we cannot show you results from one. If you add it, keep the Gmail step as a draft until you trust the output, and set a spending limit with your AI provider.
When to use a CRM instead of Sheets
Google Sheets can work for a simple, low-volume process. A CRM becomes more useful when several people manage leads, you need pipeline stages, reminders, or a complete customer history. Our guide to CRM automation workflows shows what a CRM can run for you, and how to build a sales pipeline covers the stages. If you are considering GoHighLevel, start with GoHighLevel for beginners.
Privacy and security notes
- A Google Sheet full of leads is personal data. Share it only with the people who need it.
- Use fake data while you test, as we did.
- Do not paste API keys, passwords or tokens into screenshots, forum posts or the Sheet.
- Crop or blur screenshots before you share them. Ours hide credential names and document IDs.
- If you add AI later, remember the lead's message is sent to your AI provider.
- Tell leads how you use their details, especially if you serve customers in the UK, Canada or the EU. We did not research local email or privacy rules for this guide, so check the rules that apply to you.
Frequently asked questions
Do I need AI for this workflow?
No. Our tested version has no AI step. A template reply is simple to build and easy to review. See what AI automation is if you want to add it later.
Why create a draft instead of sending the email?
A draft gives you a safe first version. You can read what the workflow would say before it goes to a real person. We did not test the Gmail Send operation.
Can I use a Webhook instead of the Form Trigger?
n8n's docs describe the Webhook node as giving you a URL that receives data from external services, so it is one option if you already have a form. We did not test it.
What happens if the same person submits the form twice?
In our setup the status step matches on Email, so the existing row would be updated. Pick a different matching approach if you want a new row each time.
Do I need to publish the workflow?
To run the form for real visitors, yes. In n8n you publish the workflow so the production URL becomes active. We tested only the test URL.
Want this built for your business?
Want a lead follow-up workflow like this built for your business? Ai Spark can help you map, build and test the process. Get in touch and tell us how leads reach you today.
Official sources
- n8n Form Trigger node
- n8n Webhook node
- n8n Google Sheets node: Sheet Within Document operations
- n8n Gmail node: Draft operations
- n8n Edit Fields (Set) node
- n8n expressions for data transformation
- n8n expression reference ($now and time zones)
- n8n executions
- n8n credentials
- n8n error handling
- n8n OpenAI node
Last updated 18 October 2026. Tested on a self-hosted n8n Community Edition, version 2.33.6.